prisma-bindingからNexusへ
概要
このガイドは、現在非推奨のバージョンのnexus-plugin-prismaを使用しているため、完全に最新のものではありません。これはまだ機能しますが、今後は新しいnexus-prismaライブラリまたはPothosのような代替のコードファーストGraphQLライブラリを使用することをお勧めします。ご不明な点がございましたら、Discordにご参加ください。
このアップグレードガイドでは、Prisma 1をベースとし、prisma-bindingを使用してGraphQLサーバーを実装するNode.jsプロジェクトを移行する方法について説明します。
コードは@nexus/schemaとnexus-plugin-prismaに移行されます。prisma-bindingで使用されるSDLファーストのアプローチとは異なり、NexusはコードファーストのアプローチでGraphQLスキーマを構築します。これら2つのアプローチの主な違いについては、こちらの記事で学ぶことができます。SDLファーストのアプローチを継続して使用したい場合は、prisma-bindingからSDLファーストのセットアップにアップグレードするためのガイドを参照してください。
このガイドでは、JavaScriptからTypeScriptへの移行方法も説明するため、基本的には既存のアプリケーションの完全な書き換えを前提としています。アプリケーションをJavaScriptで実行し続けたい場合は、TypeScriptのセットアップに関する指示を無視し、これまで通りJavaScriptを使用し続けてください。
このガイドでは、Prisma ORMレイヤーのアップグレードガイドをすでに完了していることを前提としています。つまり、以下の作業がすでに完了していることになります。
- Prisma ORM 2.0 CLIをインストール済み
- Prisma ORM 2.0スキーマを作成済み
- データベースをイントロスペクトし、潜在的なスキーマの非互換性を解決済み
- Prisma Clientをインストールおよび生成済み
さらに、このガイドでは、ファイル構造が以下のように類似していることを前提としています。
.
├── README.md
├── package.json
├── prisma
│   └── schema.prisma
├── prisma1
│   ├── datamodel.prisma
│   └── prisma.yml
└── src
    ├── generated
    │   └── prisma.graphql
    ├── index.js
    └── schema.graphql
重要な点は以下の通りです
- Prisma ORM 2.0スキーマを含む
prismaというフォルダー - アプリケーションコードと
schema.graphqlというスキーマを含むsrcというフォルダー
プロジェクト構造がこれと異なる場合は、このガイドの指示を自身のセットアップに合わせて調整する必要があります。
1. Nexusのインストールと設定
1.1. Nexus依存関係のインストール
最初のステップは、プロジェクトにNexusの依存関係をインストールすることです。
npm install @nexus/schema
次に、Nexus用のPrisma ORMプラグインをインストールします。これにより、PrismaモデルをGraphQL APIで公開できるようになります。
npm install nexus-plugin-prisma
nexus-plugin-prismaの依存関係には、必要なPrisma ORMのすべての依存関係がバンドルされています。したがって、アプリケーションのPrisma ORMレイヤーをアップグレードした際にインストールした依存関係を削除する必要があります。
npm uninstall @prisma/cli @prisma/client
ただし、Prisma ORM 2.0 CLIはこれまで通りおなじみのコマンドで呼び出すことができます。
npx prisma
1.2. TypeScriptの設定
このガイドではTypeScriptを使用するため、必要な依存関係を追加する必要があります。
npm install typescript ts-node-dev --save-dev
プロジェクトのルートディレクトリにtsconfig.jsonという名前の新しいファイルを作成します。
touch tsconfig.json
次に、新しいファイルに以下の内容を追加します。
{
  "compilerOptions": {
    "skipLibCheck": true,
    "strict": true,
    "rootDir": "src",
    "noEmit": true
  },
  "include": ["src/**/*"]
}
1.3. 基本的なNexusセットアップの作成
srcディレクトリ内に、APIのルートソースファイルであるindex.tsを作成します。
touch src/index.ts
このガイドでは、アプリケーション全体をindex.ts内に記述しますが、実際には、この例に示されているように、GraphQL型を複数のファイルに分割することをお勧めします。
基本的なセットアップのために、このコードをindex.tsに追加します。
import { queryType, makeSchema } from '@nexus/schema'
import { nexusSchemaPrisma } from 'nexus-plugin-prisma/schema'
import { GraphQLServer } from 'graphql-yoga'
import { createContext } from './context'

const Query = queryType({
  definition(t) {
    t.string('hello', () => {
      return 'Hello Nexus!'
    })
  },
})

export const schema = makeSchema({
  types: [Query],
  plugins: [nexusSchemaPrisma({ experimentalCRUD: true })],
  outputs: {
    schema: __dirname + '/../schema.graphql',
    typegen: __dirname + '/generated/nexus.ts',
  },
  typegenAutoConfig: {
    contextType: 'Context.Context',
    sources: [
      {
        source: '@prisma/client',
        alias: 'prisma',
      },
      {
        source: require.resolve('./context'),
        alias: 'Context',
      },
    ],
  },
})

new GraphQLServer({ schema, context: createContext() }).start(() =>
  console.log(`Server ready at: https://:4000`)
)
この設定には、Nexus用のPrisma ORMプラグインの設定がすでに含まれていることに注意してください。これにより、このガイドの後半で紹介するt.modelとt.crudの機能が有効になります。
typegenAutoConfig設定では、アプリケーション開発時にエディタが自動補完を提供できるように、追加の型を提供しています。現時点では、プロジェクトにまだ存在しないcontext.tsというファイルが参照されています。このファイルには、GraphQLリゾルバーチェーンを介して渡されるcontextオブジェクトの型が含まれます。
srcディレクトリ内に新しいcontext.tsファイルを作成します。
touch src/context.ts
次に、以下のコードを追加します。
import { PrismaClient } from '@prisma/client'

const prisma = new PrismaClient()

export interface Context {
  prisma: PrismaClient
}

export function createContext(): Context {
  return { prisma }
}
次に、package.json内のscriptsセクションを調整し、以下のコマンドを含めます。
{
  "scripts": {
    "start": "node dist/server",
    "clean": "rm -rf dist",
    "build": "npm -s run clean && npm -s run generate && tsc",
    "generate": "npm -s run generate:prisma && npm -s run generate:nexus",
    "generate:prisma": "prisma generate",
    "generate:nexus": "ts-node --transpile-only src/schema",
    "dev": "ts-node-dev --no-notify --respawn --transpile-only src"
  }
}
devスクリプトは、アプリケーション開発時に常にバックグラウンドで実行しておくべき開発サーバーを起動します。これは、Nexusがバックグラウンドでコード生成を行うため重要です。
以下のコマンドを使用して開発サーバーを起動できます。
npm run dev
以下のCLI出力が表示されるはずです。
Server ready at: https://:4000
GraphQLサーバーは現在https://:4000で実行されています。今のところ、以下の単一のGraphQLクエリを送信できます。
{
  hello
}
以下の手順では、prisma-bindingで実装された既存のSDLファーストGraphQLスキーマを、Nexusを使用した同等のセットアップに移行する方法を説明します。
2. GraphQL型の作成
アップグレードプロセスの次のステップは、GraphQL型を作成することです。この場合、GraphQL型はPrismaモデルを反映します(prisma-bindingのセットアップでも同様だったはずです)。GraphQL型がPrismaモデルから逸脱する場合でも、Nexus APIを使用して公開されるGraphQL型を簡単に調整できます。
このガイドでは、すべてのコードを単一のファイルに保持します。ただし、個人の好みに応じてファイルを構造化し、それに応じてimportすることができます。
Nexusでは、GraphQL型はobjectType関数を介して定義されます。objectTypeをインポートし、最初のGraphQL型のひな形から始めます。この場合、PrismaスキーマのUserモデルをGraphQLにマッピングすることから始めます。
import { objectType } from 'nexus'

const User = objectType({
  name: 'User',
  definition(t) {
    // the fields of the type will be defined here
  },
})
このコードを配置したら、Userモデルのフィールドを1つずつ公開し始めることができます。エディタの自動補完を使用して、入力の手間を省くことができます。definition関数の本体内でt.model.と入力し、CTRL+SPACEを押すと、自動補完が表示され、Userモデルで定義されているすべてのフィールドが提案されます。
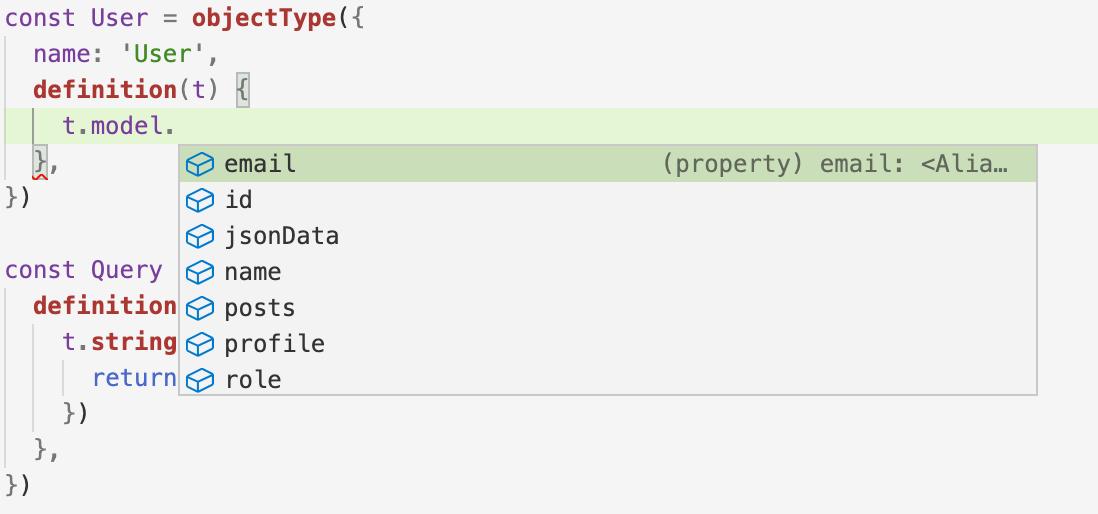
t上のmodelプロパティは、nexus-plugin-prismaによって提供されることに注意してください。これは、Prismaスキーマからの型情報を活用し、PrismaモデルをGraphQL経由で公開することを可能にします。
このようにして、モデルのすべてのフィールドを公開するまで、オブジェクト型の定義を完了することができます。
const User = objectType({
  name: 'User',
  definition(t) {
    t.model.id()
    t.model.email()
    t.model.name()
    t.model.jsonData()
    t.model.role()
    t.model.profile()
    t.model.posts()
  },
})
この時点で、リレーションフィールド(この場合はprofileとpostsで、どちらも他のオブジェクト型を指します)がTypeScriptエラーを出す可能性があります。これは予期された動作であり、残りの型を追加するとこれらのエラーは自動的に解決されます。
注意:
npm run devで起動したNexus開発サーバーは常に実行し続けるようにしてください。これにより、ファイルを保存するたびにバックグラウンドで自動補完を可能にする生成されたNexus型が常に更新されます。
t.model.postsリレーションがPostオブジェクトのリストを公開することに注意してください。デフォルトでは、Nexusはそのリストのページネーションプロパティのみを公開します。そのリレーションに並べ替えやフィルタリングも追加したい場合は、それらを明示的に有効にする必要があります。
const User = objectType({
  name: 'User',
  definition(t) {
    t.model.id()
    t.model.email()
    t.model.name()
    t.model.jsonData()
    t.model.role()
    t.model.profile()
    t.model.posts({
      filtering: true,
      ordering: true,
    })
  },
})
objectType関数を使用して型を定義した後、Nexusで構築しているGraphQLスキーマに手動で追加する必要があります。これは、makeSchema関数にオプションとして提供されるtypesに追加することで行えます。
export const schema = makeSchema({
  types: [Query, User],
  plugins: [nexusSchemaPrisma()],
  outputs: {
    schema: __dirname + '/../schema.graphql',
    typegen: __dirname + '/generated/nexus.ts',
  },
  typegenAutoConfig: {
    sources: [
      {
        source: '@prisma/client',
        alias: 'prisma',
      },
    ],
  },
})
最初の型の定義が完了したら、残りの型を定義し始めることができます。
クリックしてサンプルデータモデルの完全版を表示
すべてのサンプルPrismaモデルをNexusで公開するには、以下のコードが必要です。
const User = objectType({
  name: 'User',
  definition(t) {
    t.model.id()
    t.model.email()
    t.model.name()
    t.model.jsonData()
    t.model.role()
    t.model.profile()
    t.model.posts({
      filtering: true,
      ordering: true,
    })
  },
})

const Post = objectType({
  name: 'Post',
  definition(t) {
    t.model.id()
    t.model.createdAt()
    t.model.updatedAt()
    t.model.title()
    t.model.content()
    t.model.published()
    t.model.author()
    t.model.authorId()
    t.model.categories({
      filtering: true,
      ordering: true,
    })
  },
})

const Profile = objectType({
  name: 'Profile',
  definition(t) {
    t.model.id()
    t.model.bio()
    t.model.userId()
    t.model.user()
  },
})

const Category = objectType({
  name: 'Category',
  definition(t) {
    t.model.id()
    t.model.name()
    t.model.posts({
      filtering: true,
      ordering: true,
    })
  },
})
makeSchemaに提供されるtypesオプションに、新しく定義されたすべての型を含めるようにしてください。
export const schema = makeSchema({
  types: [Query, User, Post, Profile, Category],
  plugins: [nexusSchemaPrisma()],
  outputs: {
    schema: __dirname + '/../schema.graphql',
    typegen: __dirname + '/generated/nexus.ts',
  },
  typegenAutoConfig: {
    sources: [
      {
        source: '@prisma/client',
        alias: 'prisma',
      },
    ],
  },
})
生成されたGraphQLスキーマファイル./schema.graphqlで、現在のGraphQLスキーマのSDLバージョンを確認できます。
3. GraphQL操作の移行
次のステップとして、「以前の」GraphQL APIから、Nexusで構築された新しいAPIへ、すべてのGraphQLのクエリとミューテーションの移行を開始できます。
このガイドでは、以下のサンプルGraphQLスキーマを使用します。
# import Post from './generated/prisma.graphql'
# import User from './generated/prisma.graphql'
# import Category from './generated/prisma.graphql'

input UserUniqueInput {
  id: String
  email: String
}

type Query {
  posts(searchString: String): [Post!]!
  user(userUniqueInput: UserUniqueInput!): User
  users(where: UserWhereInput, orderBy: Enumerable<UserOrderByInput>, skip: Int, after: String, before: String, first: Int, last: Int): [User]!
}

type Mutation {
  createUser(data: UserCreateInput!): User!
  createDraft(title: String!, content: String, authorId: ID!): Post
  updateBio(userUniqueInput: UserUniqueInput!, bio: String!): User
  addPostToCategories(postId: String!, categoryIds: [String!]!): Post
}
3.1. GraphQLクエリの移行
このセクションでは、prisma-bindingからNexusへのすべてのGraphQLのクエリを移行します。
3.1.1. usersクエリ(forwardToを使用)の移行
サンプルAPIでは、サンプルGraphQLスキーマのusersクエリは次のように定義され、実装されています。
prisma-bindingを使用したSDLスキーマ定義
type Query {
  users(where: UserWhereInput, orderBy: Enumerable<UserOrderByInput>, skip: Int, after: String, before: String, first: Int, last: Int): [User]!
  # ... other queries
}
prisma-bindingを使用したリゾルバーの実装
const resolvers = {
  Query: {
    users: forwardTo('prisma'),
    // ... other resolvers
  },
}
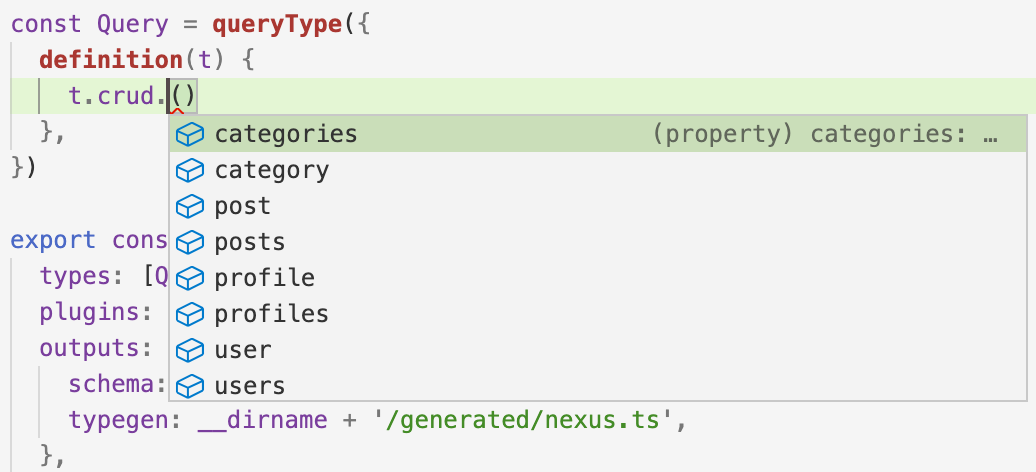
Nexusで同じ動作を再現するには、definition関数内のt変数にあるcrudプロパティを使用します。
modelと同様に、このプロパティはnexus-prisma-pluginを使用しているため利用可能です。これはPrismaモデルからの型情報を活用し、内部でリゾルバーを自動生成します。crudプロパティも自動補完をサポートしているため、エディタで利用可能なすべてのクエリを再度探索できます。
nexus-prisma-pluginによるクエリの転送
usersクエリをGraphQL APIに追加するには、クエリ型定義に以下の行を追加します。
const Query = queryType({
  definition(t) {
    t.crud.users({
      filtering: true,
      ordering: true,
    })
  },
})
Nexus開発サーバーが実行中であれば、ファイルを保存するとGraphQL APIが更新され、新しいusersクエリが公開されます。これは、生成されたschema.graphqlファイル内のQuery型を見ることで確認できます。
type Query {
  users(after: UserWhereUniqueInput, before: UserWhereUniqueInput, first: Int, last: Int, orderBy: Enumerable<UserOrderByInput>, skip: Int, where: UserWhereInput): [User!]!
}
これで、新しいAPIに対して最初のクエリを記述できます。例:
{
  users {
    id
    name
    profile {
      id
      bio
    }
    posts {
      id
      title
      categories {
        id
        name
      }
    }
  }
}
アプリケーションがforwardToを使用してPrisma ORMのすべてのCRUD操作を公開している場合、t.crudを介して同じアプローチで残りのすべてを追加し続けることができます。「カスタム」クエリをNexusを使用して定義および解決する方法については、次のセクションに進んでください。
3.1.2. posts(searchString: String): [Post!]!クエリの移行
postsクエリは次のように定義され、実装されています。
prisma-bindingを使用したSDLスキーマ定義
type Query {
  posts(searchString: String): [Post!]!
  # ... other queries
}
prisma-bindingを使用したリゾルバーの実装
const resolvers = {
  Query: {
    posts: (_, args, context, info) => {
      return context.prisma.query.posts(
        {
          where: {
            OR: [
              { title_contains: args.searchString },
              { content_contains: args.searchString },
            ],
          },
        },
        info
      )
    },
    // ... other resolvers
  },
}
nexusを使用したコードファーストスキーマ定義
Nexusで同じ動作を得るには、queryTypeにt.field定義を追加する必要があります。
const Query = queryType({
  definition(t) {
    // ... previous queries

    t.list.field('posts', {
      type: 'Post',
      nullable: false,
      args: { searchString: stringArg() },
    })
  },
})
このコードはエディタで型エラーを引き起こす可能性がありますが、schema.graphql内の生成されたGraphQLスキーマのSDLバージョンをすでに確認できます。これにより、GraphQLスキーマに正しい定義が追加されていることがわかります。
type Query {
  posts(searchString: String): [Post!]!
  users(after: UserWhereUniqueInput, before: UserWhereUniqueInput, first: Int, last: Int, orderBy: Enumerable<UserOrderByInput>, skip: Int, where: UserWhereInput): [User!]!
}
しかし、このコードには実際のリゾルバーロジックが欠けています。次にこれらを追加します。
nexusを使用したリゾルバーの実装
Nexusでリゾルバーを次のように追加できます。
const Query = queryType({
  definition(t) {
    // ... previous queries

    t.list.field('posts', {
      type: 'Post',
      nullable: false,
      args: { searchString: stringArg() },
      resolve: (_, args, context) => {
        return context.prisma.post.findMany({
          where: {
            OR: [
              {
                title: { contains: args.searchString },
              },
              {
                content: { contains: args.searchString },
              },
            ],
          },
        })
      },
    })
  },
})
実装を検証するには、例えば以下のサンプルクエリをGraphQLサーバーに送信できます。
{
  posts {
    id
    title
    author {
      id
      name
    }
  }
}
3.1.2. user(uniqueInput: UserUniqueInput): Userクエリの移行
サンプルアプリケーションでは、userクエリは次のように定義され、実装されています。
prisma-bindingを使用したSDLスキーマ定義
type Query {
  user(userUniqueInput: UserUniqueInput): User
  # ... other queries
}

input UserUniqueInput {
  id: String
  email: String
}
これは、Nexusでのinput型の使用方法を示すための、やや不自然な例であることに注意してください。
prisma-bindingを使用したリゾルバーの実装
const resolvers = {
  Query: {
    user: (_, args, context, info) => {
      return context.prisma.query.user(
        {
          where: args.userUniqueInput,
        },
        info
      )
    },
    // ... other resolvers
  },
}
nexusを使用したコードファーストスキーマ定義
Nexusで同じ動作を得るには、queryTypeにt.field定義を追加し、Userモデルの2つの@uniqueフィールドを含むinputObjectTypeを定義する必要があります。
import { inputObjectType, arg } from '@nexus/schema'

const UserUniqueInput = inputObjectType({
  name: 'UserUniqueInput',
  definition(t) {
    t.string('id')
    t.string('email')
  },
})

const Query = queryType({
  definition(t) {
    // ... previous queries

    t.field('user', {
      type: 'User',
      args: {
        userUniqueInput: arg({
          type: 'UserUniqueInput',
          nullable: false,
        }),
      },
    })
  },
})
UserUniqueInputはGraphQLスキーマの新しい型であるため、makeSchemaに渡されるtypesオプションに再度追加する必要があります。
export const schema = makeSchema({
  types: [Query, User, Post, Profile, Category, UserUniqueInput],
  plugins: [nexusSchemaPrisma()],
  outputs: {
    schema: __dirname + '/../schema.graphql',
    typegen: __dirname + '/generated/nexus.ts',
  },
  typegenAutoConfig: {
    sources: [
      {
        source: '@prisma/client',
        alias: 'prisma',
      },
    ],
  },
})
生成されたschema.graphql内のGraphQLスキーマのSDLバージョンを見ると、この変更によってすでにGraphQLスキーマに正しい定義が追加されていることがわかります。
type Query {
  posts(searchString: String): [Post!]
  user(userUniqueInput: UserUniqueInput!): User
  users(after: UserWhereUniqueInput, before: UserWhereUniqueInput, first: Int, last: Int, orderBy: Enumerable<UserOrderByInput>, skip: Int, where: UserWhereInput): [User!]!
}

input UserUniqueInput {
  email: String
  id: String
}
GraphQL Playgroundを介して、すでに該当するクエリを送信することもできます。
{
  user(userUniqueInput: { email: "alice@prisma.io" }) {
    id
    name
  }
}
しかし、リゾルバーがまだ実装されていないため、現時点ではデータは返されません。
nexusを使用したコードファーストのリゾルバー実装
それは、そのクエリに対するリゾルバーの実装がまだ不足しているためです。Nexusでリゾルバーを次のように追加できます。
const UserUniqueInput = inputObjectType({
  name: 'UserUniqueInput',
  definition(t) {
    t.string('id')
    t.string('email')
  },
})

const Query = queryType({
  definition(t) {
    // ... previous queries

    t.field('user', {
      type: 'User',
      nullable: true,
      args: {
        userUniqueInput: arg({
          type: 'UserUniqueInput',
          nullable: false,
        }),
      },
      resolve: (_, args, context) => {
        return context.prisma.user.findUnique({
          where: {
            id: args.userUniqueInput?.id,
            email: args.userUniqueInput?.email,
          },
        })
      },
    })
  },
})
以前と同じクエリを再送信すると、実際のデータが返されることがわかります。
3.2. GraphQLミューテーションの移行
このセクションでは、サンプルスキーマからのGraphQLミューテーションをNexusに移行します。
3.2.1. Mutation型の定義
ミューテーションを移行する最初のステップは、GraphQL APIのMutation型を定義することです。それが完了したら、徐々に操作を追加できます。以下の定義をindex.tsに追加します。
import { mutationType } from '@nexus/schema'

const Mutation = mutationType({
  definition(t) {
    // your GraphQL mutations + resolvers will be defined here
  },
})
新しいMutation型がNexusによって認識されるようにするには、makeSchemaに提供されるtypesに追加する必要があります。
export const schema = makeSchema({
  types: [Query, User, Post, Profile, Category, UserUniqueInput, Mutation],
  plugins: [nexusSchemaPrisma()],
  outputs: {
    schema: __dirname + '/../schema.graphql',
    typegen: __dirname + '/generated/nexus.ts',
  },
  typegenAutoConfig: {
    sources: [
      {
        source: '@prisma/client',
        alias: 'prisma',
      },
    ],
  },
})
3.2.2. createUserミューテーション(forwardToを使用)の移行
サンプルアプリケーションでは、サンプルGraphQLスキーマのcreateUserミューテーションは次のように定義され、実装されています。
prisma-bindingを使用したSDLスキーマ定義
type Mutation {
  createUser(data: UserCreateInput!): User!
  # ... other mutations
}
prisma-bindingを使用したリゾルバーの実装
const resolvers = {
  Mutation: {
    createUser: forwardTo('prisma'),
    // ... other resolvers
  },
}
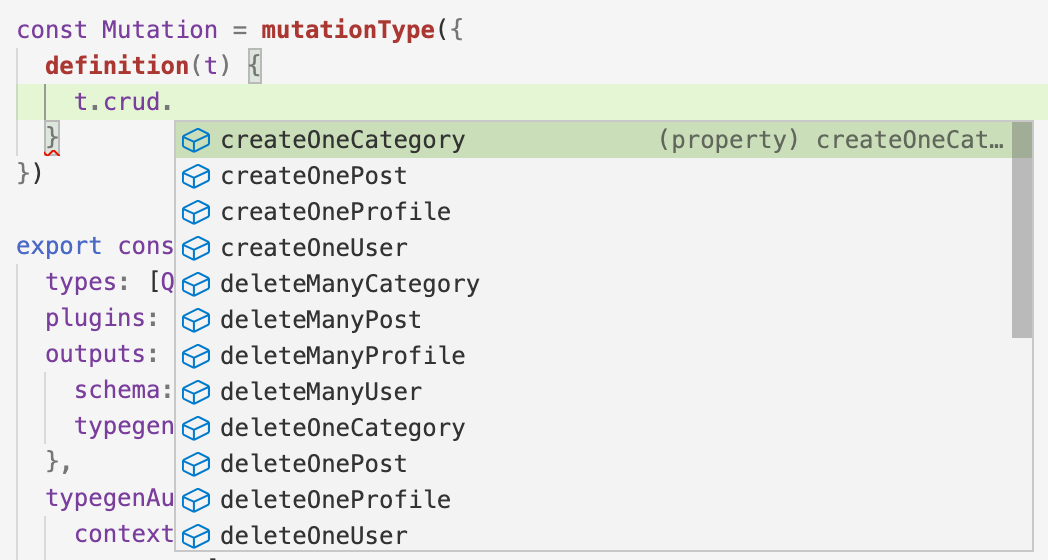
GraphQLクエリの転送と同様に、definition関数内のt変数にあるcrudプロパティを使用して、Prismaモデルの完全なCRUD機能を提供できます。
modelと同様に、このプロパティはnexus-prisma-pluginを使用しているため利用可能です。これはPrismaモデルからの型情報を活用し、内部でリゾルバーを自動生成します。crudプロパティはミューテーションの定義時にも自動補完をサポートしているため、エディタで利用可能なすべての操作を再度探索できます。
nexus-prisma-pluginによるミューテーションの転送
createUserミューテーションをGraphQL APIに追加するには、クエリ型定義に以下の行を追加します。
const Mutation = mutationType({
  definition(t) {
    t.crud.createOneUser({
      alias: 'createUser',
    })
  },
})
GraphQLスキーマにおけるミューテーションのデフォルト名はcreateOneUser(t.crudによって公開される関数にちなんで名付けられています)であることに注意してください。これをcreateUserに名前変更するには、aliasプロパティを指定する必要があります。
Nexus開発サーバーが実行中であれば、ファイルを保存するとGraphQL APIが更新され、新しいcreateUserミューテーションが公開されます。これは、生成されたschema.graphqlファイル内のMutation型を見ることで確認できます。
type Mutation {
  createUser(data: UserCreateInput!): User!
}
これで、新しいAPIに対して最初のミューテーションを記述できます。例:
mutation {
  createUser(data: { name: "Alice", email: "alice@prisma.io" }) {
    id
  }
}
アプリケーションがforwardToを使用してPrisma ClientのすべてのCRUD操作を公開している場合、t.crudを介して同じアプローチで残りのすべてを追加し続けることができます。「カスタム」ミューテーションをNexusを使用して定義および解決する方法については、次のセクションに進んでください。
3.2.3. createDraft(title: String!, content: String, authorId: String!): Post!クエリの移行
サンプルアプリケーションでは、createDraftミューテーションは次のように定義され、実装されています。
prisma-bindingを使用したSDLスキーマ定義
type Mutation {
  createDraft(title: String!, content: String, authorId: String!): Post!
  # ... other mutations
}
prisma-bindingを使用したリゾルバーの実装
const resolvers = {
  Mutation: {
    createDraft: (_, args, context, info) => {
      return context.prisma.mutation.createPost(
        {
          data: {
            title: args.title,
            content: args.content,
            author: {
              connect: {
                id: args.authorId,
              },
            },
          },
        },
        info
      )
    },
    // ... other resolvers
  },
}
nexusを使用したコードファーストスキーマ定義
Nexusで同じ動作を得るには、mutationTypeにt.field定義を追加する必要があります。
const Mutation = mutationType({
  definition(t) {
    // ... previous mutations

    t.field('createDraft', {
      type: 'Post',
      args: {
        title: stringArg({ nullable: false }),
        content: stringArg(),
        authorId: stringArg({ nullable: false }),
      },
    })
  },
})
生成されたschema.graphql内のGraphQLスキーマのSDLバージョンを見ると、この変更によってすでにGraphQLスキーマに正しい定義が追加されていることがわかります。
type Mutation {
  createUser(data: UserCreateInput!): User!
  createDraft(title: String!, content: String, authorId: String!): Post!
}
GraphQL Playgroundを介して、すでに該当するミューテーションを送信することもできます。
mutation {
  createDraft(title: "Hello World", authorId: "__AUTHOR_ID__") {
    id
    published
    author {
      id
      name
    }
  }
}
しかし、リゾルバーがまだ実装されていないため、新しいPostレコードは作成されず、レスポンスでデータが返されることもありません。
nexusを使用したリゾルバーの実装
それは、そのミューテーションに対するリゾルバーの実装がまだ不足しているためです。Nexusでリゾルバーを次のように追加できます。
const Mutation = mutationType({
  definition(t) {
    // ... previous mutations

    t.field('createDraft', {
      type: 'Post',
      args: {
        title: stringArg({ nullable: false }),
        content: stringArg(),
        authorId: stringArg({ nullable: false }),
      },
      resolve: (_, args, context) => {
        return context.prisma.post.create({
          data: {
            title: args.title,
            content: args.content,
            author: {
              connect: { id: args.authorId },
            },
          },
        })
      },
    })
  },
})
以前と同じクエリを再送信すると、新しいPostレコードが作成され、有効なデータが返されることがわかります。
3.2.4. updateBio(bio: String, userUniqueInput: UserUniqueInput!): Userミューテーションの移行
サンプルアプリケーションでは、updateBioミューテーションは次のように定義され、実装されています。
prisma-bindingを使用したSDLスキーマ定義
type Mutation {
  updateBio(bio: String!, userUniqueInput: UserUniqueInput!): User
  # ... other mutations
}
prisma-bindingを使用したリゾルバーの実装
const resolvers = {
  Mutation: {
    updateBio: (_, args, context, info) => {
      return context.prisma.mutation.updateUser(
        {
          data: {
            profile: {
              update: { bio: args.bio },
            },
          },
          where: { id: args.userId },
        },
        info
      )
    },
    // ... other resolvers
  },
}
nexusを使用したコードファーストスキーマ定義
Nexusで同じ動作を得るには、mutationTypeにt.field定義を追加する必要があります。
const Mutation = mutationType({
  definition(t) {
    // ... previous mutations

    t.field('updateBio', {
      type: 'User',
      args: {
        userUniqueInput: arg({
          type: 'UserUniqueInput',
          nullable: false,
        }),
        bio: stringArg({ nullable: false }),
      },
    })
  },
})
生成されたschema.graphql内のGraphQLスキーマのSDLバージョンを見ると、この変更によってすでにGraphQLスキーマに正しい定義が追加されていることがわかります。
type Mutation {
  createUser(data: UserCreateInput!): User!
  createDraft(title: String!, content: String, authorId: String!): Post!
  updateBio(bio: String!, userUniqueInput: UserUniqueInput!): User
}
GraphQL Playgroundを介して、すでに該当するミューテーションを送信することもできます。
mutation {
  updateBio(
    userUniqueInput: { email: "alice@prisma.io" }
    bio: "I like turtles"
  ) {
    id
    name
    profile {
      id
      bio
    }
  }
}
しかし、リゾルバーがまだ実装されていないため、データベースは更新されず、レスポンスでデータが返されることもありません。
nexusを使用したリゾルバーの実装
それは、そのクエリに対するリゾルバーの実装がまだ不足しているためです。Nexusでリゾルバーを次のように追加できます。
const Mutation = mutationType({
  definition(t) {
    // ... previous mutations

    t.field('updateBio', {
      type: 'User',
      args: {
        userUniqueInput: arg({
          type: 'UserUniqueInput',
          nullable: false
        }),
        bio: stringArg()
      },
      resolve: (_, args, context) => {
        return context.prisma.user.update({
          where: {
            id: args.userUniqueInput?.id,
            email: args.userUniqueInput?.email
          },
          data: {
            profile: {
              create: { bio: args.bio }
            }
          }
        })
      }
    }
  }
})
以前と同じクエリを再送信すると、nullではなく実際のデータが返されることがわかります。
3.2.5. addPostToCategories(postId: String!, categoryIds: [String!]!): Postミューテーションの移行
サンプルアプリケーションでは、addPostToCategoriesミューテーションは次のように定義され、実装されています。
prisma-bindingを使用したSDLスキーマ定義
type Mutation {
  addPostToCategories(postId: String!, categoryIds: [String!]!): Post
  # ... other mutations
}
prisma-bindingを使用したリゾルバーの実装
const resolvers = {
  Mutation: {
    addPostToCategories: (_, args, context, info) => {
      const ids = args.categoryIds.map((id) => ({ id }))
      return context.prisma.mutation.updatePost(
        {
          data: {
            categories: {
              connect: ids,
            },
          },
          where: {
            id: args.postId,
          },
        },
        info
      )
    },
    // ... other resolvers
  },
}
nexusを使用したコードファーストスキーマ定義
Nexusで同じ動作を得るには、mutationTypeにt.field定義を追加する必要があります。
const Mutation = mutationType({
  definition(t) {
    // ... mutations from before

    t.field('addPostToCategories', {
      type: 'Post',
      args: {
        postId: stringArg({ nullable: false }),
        categoryIds: stringArg({
          list: true,
          nullable: false,
        }),
      },
    })
  },
})
生成されたschema.graphql内のGraphQLスキーマのSDLバージョンを見ると、この変更によってすでにGraphQLスキーマに正しい定義が追加されていることがわかります。
type Mutation {
  createUser(data: UserCreateInput!): User!
  createDraft(title: String!, content: String, authorId: String!): Post!
  updateBio(bio: String, userUniqueInput: UserUniqueInput!): User
  addPostToCategories(postId: String!, categoryIds: [String!]!): Post
}
GraphQL Playgroundを介して、すでに該当するクエリを送信することもできます。
mutation {
  addPostToCategories(
    postId: "__AUTHOR_ID__"
    categoryIds: ["__CATEGORY_ID_1__", "__CATEGORY_ID_2__"]
  ) {
    id
    title
    categories {
      id
      name
    }
  }
}
しかし、リゾルバーがまだ実装されていないため、データベースは更新されず、レスポンスでデータが返されることもありません。
nexusを使用したリゾルバーの実装
それは、そのクエリに対するリゾルバーの実装がまだ不足しているためです。Nexusでリゾルバーを次のように追加できます。
const Mutation = mutationType({
  definition(t) {
    // ... mutations from before
    t.field('addPostToCategories', {
      type: 'Post',
      args: {
        postId: stringArg({ nullable: false }),
        categoryIds: stringArg({
          list: true,
          nullable: false,
        }),
      },
      resolve: (_, args, context) => {
        const ids = args.categoryIds.map((id) => ({ id }))
        return context.prisma.post.update({
          where: {
            id: args.postId,
          },
          data: {
            categories: { connect: ids },
          },
        })
      },
    })
  },
})
以前と同じクエリを再送信すると、nullではなく実際のデータが返されることがわかります。
4. クリーンアップ
アプリケーション全体がPrisma ORM 2.0とNexusにアップグレードされたため、不要なファイルをすべて削除し、もはや必要ない依存関係を削除することができます。
4.1. npm依存関係のクリーンアップ
まず、Prisma 1のセットアップに関連するnpmの依存関係を削除することから始めます。
npm uninstall graphql-cli prisma-binding prisma1
4.2. 不要なファイルの削除
次に、Prisma 1セットアップのファイルを削除します。
rm prisma1/datamodel.prisma prisma1/prisma.yml
残っている.jsファイル、古いschema.graphql、およびprisma.graphqlファイルも削除できます。
4.3. Prisma ORMサーバーの停止
最後に、Prisma ORMサーバーの実行を停止できます。